
Automated build pipelines are a crucial part of professional software development. Now, you may not think of your typical hobby Arduino project as professional software development but let’s assume you’re creating an Arduino library for others to use – or even just a small open source project that may become relevant to the community at some point.
With an automated build pipeline aka continuous integration you can guarantee a certain level of quality for your project. I’m going to discuss two major things continuous integration can do for you:
- Make sure your code compiles for all intended target platforms
- Enforce a certain coding style
The first one is particularly interesting for Arduino projects since they tend to target a bunch of different microcontrollers.
The second one will become important as soon as you’re no longer the only person working on your code. Having a consistent coding style throughout the whole project makes life easier for everyone involved.
Besides that, continuous integration can do a lot more, like:
- Run automated unit tests on your code
- Automatically update the documentation of your code
The latter addresses the often neglected part of proper documentation. You can create the best library – if you’re not going to document it people are most likely not going to use it.
Project Setup
Arduino Project
Your typical Arduino project is just a folder with an Arduino Sketch in it:
MyArduinoProject
└── MyArduinoProject.ino
If this is your setup then continuous integration may admittedly be overkill. It still can’t hurt to play around with it, though.
If you want to go to the next level consider setting up your project with PlatformIO.
PlatformIO Project
PlatformIO is very well integrated with Visual Studio Code and it’s a great alternative to the Arduino IDE. It comes with built-in support for a lot of microcontrollers and even allows you to go beyond the Arduino ecosystem – but that’s definitely a whole other blog post.
Your typical PlatformIO project consists of two files:
MyPlatformIOProject
├── platformio.ini
└── src
    └── main.cpp
Although, you’re not limited to these files as they’re just the starting point. As you progress, your project may grow way beyond just two files. This is definitely going to be a territory where continuous integration makes sense.
Arduino Library
Maybe you’re not only working on a personal project but on a new Arduino library to share with the community. If that’s the case then continuous integration is absolutely for you.
Your typical Arduino library will probably look something like this:
MyArduinoLibrary
├── examples
│   └── HelloWorld
│       └── HelloWorld.ino
├── library.properties
└── src
    ├── MyArduinoLibrary.cpp
    └── MyArduinoLibrary.h
You’ll have at least one header file, one implementation file and one or more example Arduino Sketches.
On top of that, you want to make sure that your library is compatible with as many Arduino boards as possible. That’s where an automated build pipeline will really come in handy.
GitHub and Version Control
For the rest of this post I’m going to assume that your project is under version control using git and published on GitHub.
If you’re not doing this already I strongly suggest using git for all of your coding projects anyway.
GitHub is relevant here because we’re going to make use of its workflows that let you create build pipelines without the use of external services. Similar setups are possible with other services like GitLab or using continuous integration tools like Travis or CircleCI. I encourage you to check out all of these options to find the one most suited to your needs. For this blog post, however, GitHub workflows will be the tool of choice.
A Basic GitHub Workflow
Using GitHub workflows we’re basically going to use a virtual machine running the latest Ubuntu and executing a bunch of pre-defined tasks whenever a change to the code is made. This may sound overwhelming and while there certainly is a lot going on, we’re going to build this all up step by step.
The virtual machine runs on GitHub’s servers and all we’ll have to do is provide a configuration file inside the folder .github/workflows in our project. Let’s call it build.yml:
MyArduinoLibrary
├── .github
│   └── workflows
│       └── build.yml
…
The file will have the following content:
name: build
on: [pull_request, push]
jobs:
  build:
    runs-on: ubuntu-latest
  steps:
    - name: Checkout
      uses: actions/checkout@v2
It’s going to have a name — this can be anything from My awesome automated build to simply just build, which is what we’ll be using.
on: [pull_request, push] tells GitHub to execute this workflow whenever there’s a push to this repository or a new pull request is created. There are other events and more sophisticated triggers available that I won’t be covering here.
After that, all this workflow does so far is run on the latest Ubuntu and checkout the code. The last step is important because we want the workflow to work with our code.
Automated Arduino Builds
We’re now going to add another step after the Checkout step in our build.yml:
…
  steps:
    - name: Checkout
      uses: actions/checkout@v2
    - name: Build on Arduino CLI
      run: bash ci/build-arduino.sh
This step is called Build on Arduino CLI and it’s going to run a shell script located at ci/build-arduino.sh. We’re now going to create this file in our project folder:
MyArduinoLibrary
├── .github
│   └── workflows
│       └── build.yml
├── ci
│   └── build-arduino.sh
…
This script is going to install the Arduino CLI on our virtual machine and compile our code for several Arduino boards. If the compilation fails our automated build pipeline will fail, and if it succeeds we’ll know that our code is valid for all the tested Arduino platforms.
To install the Arduino CLI we more or less follow its installation guide:
#!/bin/bash

# Exit immediately if a command exits with a non-zero status.
set -e

# Enable the globstar shell option
shopt -s globstar

# Make sure we are inside the github workspace
cd $GITHUB_WORKSPACE

# Create directories
mkdir $HOME/Arduino
mkdir $HOME/Arduino/libraries

# Install Arduino IDE
export PATH=$PATH:$GITHUB_WORKSPACE/bin
curl -fsSL https://raw.githubusercontent.com/arduino/arduino-cli/master/install.sh | sh
arduino-cli config init
arduino-cli core update-index
Now, let’s add the Arduino AVR core:
# Install Arduino AVR core
arduino-cli core install arduino:avr
We’re almost ready to compile the code. If your project is an Arduino library you need to link it to the Arduino libraries directory first. Otherwise the compiler won’t be able to locate your code.
# Link Arduino library
ln -s $GITHUB_WORKSPACE $HOME/Arduino/libraries/CI_Test_Library
Now, we are ready to compile all the Arduino Sketches for the AVR core. Let’s compile them for the Uno:
# Compile all *.ino files for the Arduino Uno
for f in **/*.ino ; do
    arduino-cli compile -b arduino:avr:uno $f
done
That’s it. With this setup you have a build pipeline that automatically compiles all of your Arduino Sketches for the Arduino Uno on each push or pull request to your GitHub repository. It’s easy to add additional platforms as you just need to copy and modify the code that installs new cores and compiles your code.
For example, let’s add the Arduino Zero. Let modify the code that installs the AVR core and add another core:
# Install Arduino cores
arduino-cli core install arduino:avr
arduino-cli core install arduino:samd
Let’s also modify the code that compiles our sketches accordingly:
# Compile all *.ino files for the Arduino Uno
for f in **/*.ino ; do
    arduino-cli compile -b arduino:avr:uno $f
    arduino-cli compile -b arduino:samd:arduino_zero_native $f
done
Now you automatically test for compilation errors of your code on two different platforms.
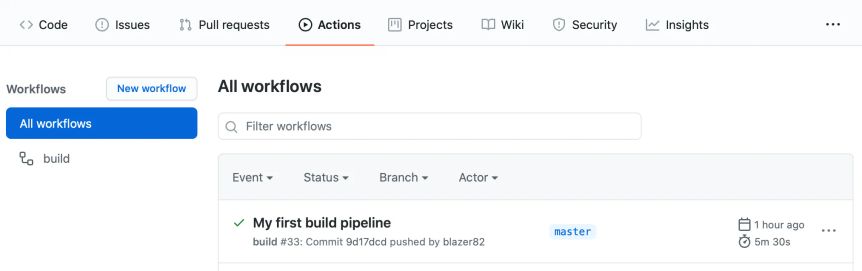
If you commit and push all of this to your GitHub repository and go to the Actions tab of your repository you should see your newly created workflow and its output:
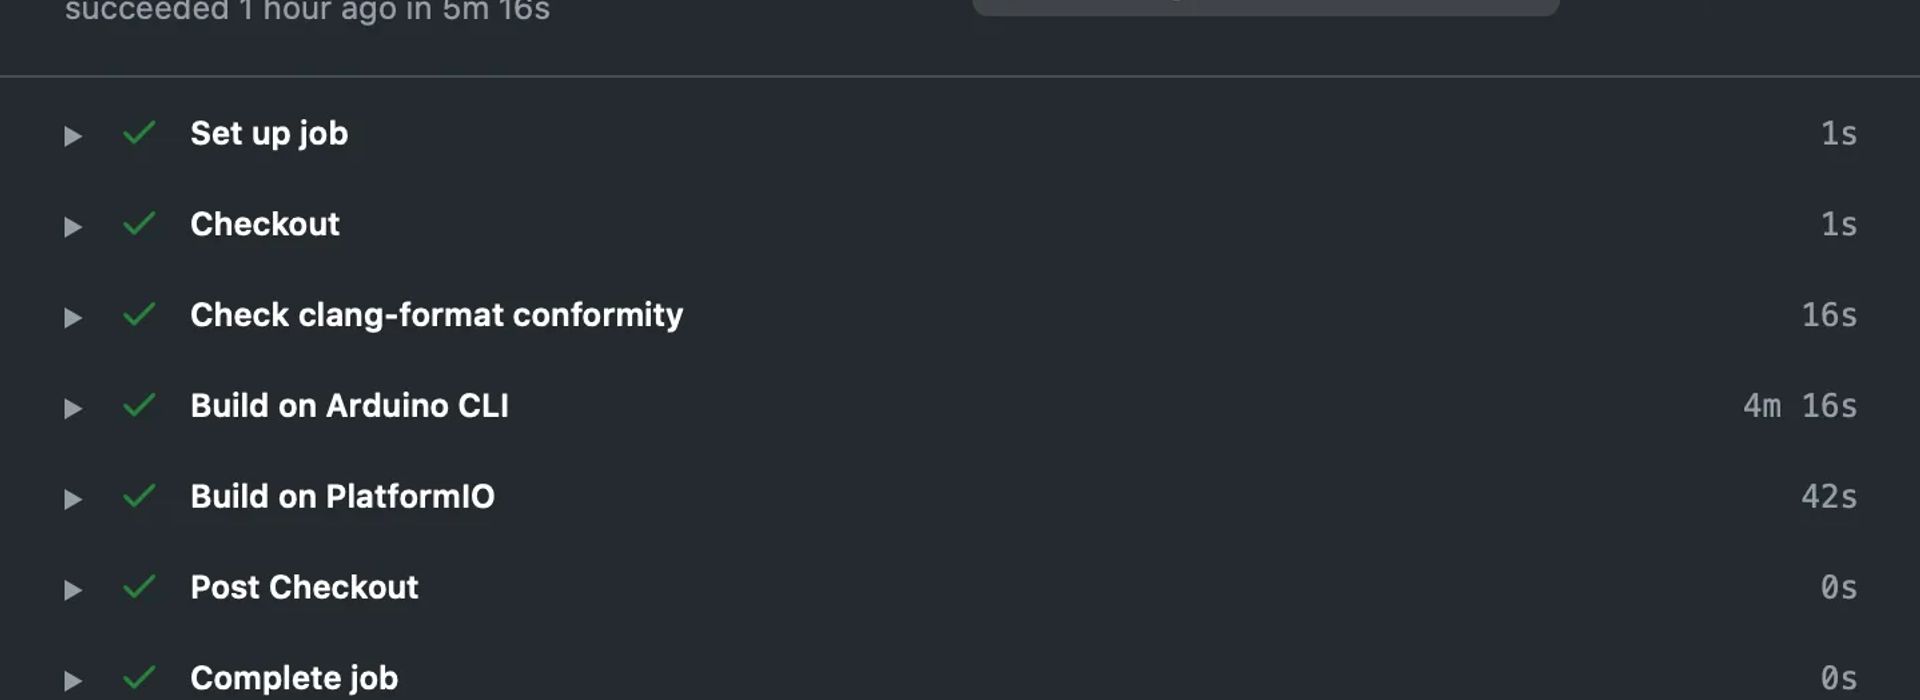
If you click on the build entry you should see something like this:
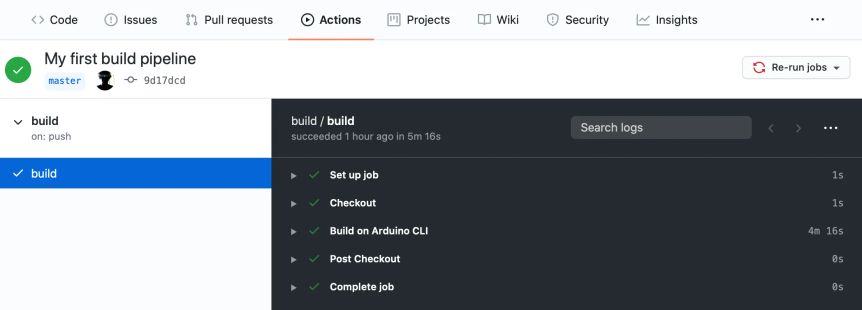
If one of the steps failed you can click on it to see the detailed log output. It also helps a lot to add additional output to your shell scripts in order to better understand what’s being executed.
Automated PlatformIO Builds
The above script will work for single Arduino Sketches and Arduino libraries with example sketches included. It won’t work for PlatformIO projects, however. For these kinds of project it’s advisable to do automated builds using the PlatformIO CLI instead of the Arduino CLI. A big advantage of this approach is that you can have continuous integration for any kind of PlatformIO project, not only the Arduino ones.
The steps involved are more or less the same as before. You add a step to your build.yml:
…
  steps:
    - name: Checkout
      uses: actions/checkout@v2
    - name: Build on PlatformIO
      run: bash ci/build-platformio.sh
You add a build-platformio.sh shell script:
MyPlatformIOProject
├── .github
│   └── workflows
│       └── build.yml
├── ci
│   └── build-platformio.sh
…
We follow the PlatformIO installation guide:
#!/bin/bash

# Exit immediately if a command exits with a non-zero status.
set -e

# Make sure we are inside the github workspace
cd $GITHUB_WORKSPACE

# Install PlatformIO CLI
export PATH=$PATH:~/.platformio/penv/bin
curl -fsSL https://raw.githubusercontent.com/platformio/platformio-core-installer/master/get-platformio.py -o get-platformio.py
python3 get-platformio.py
We then install the platforms we want to test on:
# Install Atmel AVR platform
pio platform install "atmelavr"
If your platformio.ini is set up correctly all that’s left to do is:
# Compile project
pio run
Alternatively you can directly target the environments defined in your platformio.ini:
# Compile project for the Uno
pio run -e uno
That’s it. It’s even easier than using the Arduino CLI.
Enforce a Certain Code Formatting Style
When writing C or C++ code, a tool called clang-format is often used to ensure that your code is following certain formatting style guidelines.
There are several code styles you can follow — like: LLVM, GNU, Google, Mozilla or Microsoft — and you can configure clang-format to use one of these as a base style for your code. If you’re unsure just pick one. It’s not so much about having the perfect formatting style and more about having one in the first place . You can always change and refine it later and easily reformat your whole code base.
If you’re using Visual Studio Code you can add an extension to reformat your code each time you save a file. That way you’ll never have to worry again about the formatting of your code. Similar plugins are available for other editors, too.
I suggest adding a .clang-format file to your project:
MyArduinoLibrary
├── .clang-format
…
Inside of it you configure your chosen base style as well as custom configuration options. My .clang-format currently looks something like this:
BasedOnStyle: Google
Language: Cpp
IndentWidth: 4
AlignConsecutiveMacros: true
Feel free to explore all the other options clang-format has to offer.
Once you added clang-format to your project you can integrate it into your build pipeline to make sure only properly formatted code gets into your code base.
To achieve that, we create a new step named Check clang-format conformity in our build.yml — I’d suggest adding this one right after the Checkout step:
…
  steps:
    - name: Checkout
      uses: actions/checkout@v2
    - name: Check clang-format conformity
      run: bash ci/clang-lint.sh
    - name: Build on Arduino CLI
      run: bash ci/build-arduino.sh
This step runs a shell script called clang-lint.sh. In this file we add a few lines to install clang-format:
#!/bin/bash

# Exit immediately if a command exits with a non-zero status.
set -e

# Enable the globstar shell option
shopt -s globstar

# Make sure we are inside the github workspace
cd $GITHUB_WORKSPACE

# Install clang-format
sudo apt-get -y install clang-format-10
We then loop over all the source code files and check whether their content is properly formatted:
# Check clang-format output
for f in **/*.{h,c,hpp,cpp,ino} ; do
    if [ -f "$f" ]; then
        diff $f <(clang-format -assume-filename=main.cpp $f) 1>&2
    fi
done
The main line in here is this one:
diff $f <(clang-format -assume-filename=main.cpp $f) 1>&2It runs clang-format on a file and compares its output with the actual content of the file. If the two are the same the file is already properly formatted. If they differ the file isn’t properly formatted yet.
The output of the diff command is redirected to stderr which means that any output counts as an error. If the file is properly formatted the diff will have no output and there will be no error. As soon as there’s output the build will fail and even show the wrongly formatted lines of code.
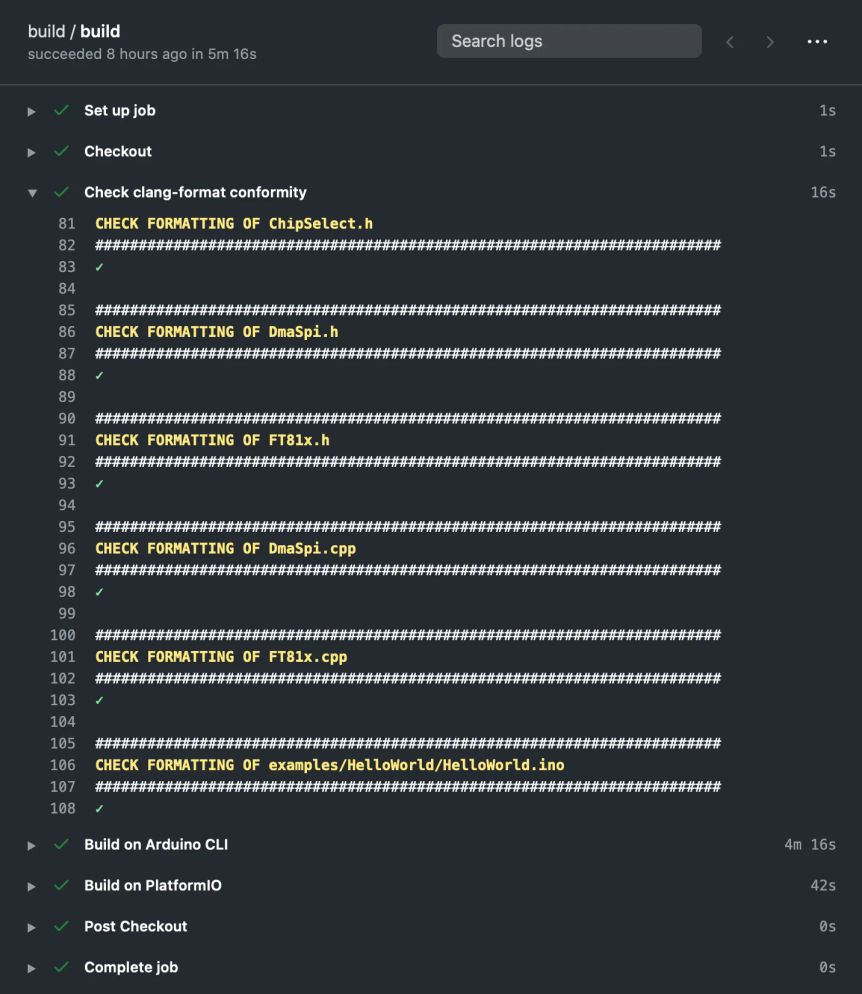
It’s highly advisable to add some output right before the diff command in order to better understand what files are being checked. Something like:
echo "Checking file ${f}"
diff $f <(clang-format -assume-filename=main.cpp $f) 1>&2
If you know your way around shell scripting you can get quite pleasing output from your build pipeline:
Final Thoughts
As we’ve seen, it’s not that hard to get started with continuous integration for your own projects. Once you’ve got a basic setup in place you can always refine it and reuse it on other projects.
An automated build pipeline gets even more powerful when combined with unit tests. Integrating these into your pipeline could be as easy as adding a pio test command to one of your scripts.
It’s up to you to decide whether continuous integration makes sense for your specific use case. As soon as you intend to share your code with others and maybe even let other people contribute to your project, I’d definitely consider it.